코드 깃허브: https://github.com/splab-ELE3021/assignment-2021037756.git
참고자료: https://eckrin.tistory.com/120
[OS] xv6 사용법 정리
0. 쉘 명령어(커널명령어) 추가 Makefile의 UPROG와 EXTRA부분에 다음과 같이 추가해준다. 1) UPROG=\ ... _new\ 2) EXTRA=\ umalloc.c new.c\ 1. 파일 추가 README file in Xv6 is a generic file too. Searching for occurrences of README i
eckrin.tistory.com
실습 목표
실습의 목표는 부모 process의 id를 리턴하는 getppid() system call을 add 하는 것이다.
1. Implement the getppid() system call
2. Implement a user program ppid
Design
구현 시 거쳐야 하는 절차는 아래와 같다.
1. Kernel part
- getppid.c 파일 생성하여 getpppid() 함수 구현
- Makefile에 소스파일(getppid.o) 추가
- defs.h에 구현한 getppid() 함수 선언
- function call을 위해 getppid.c 파일에 추가로 wrapper function 추가
- syscall.h와 syscall.c에 새로운 system call인 getppid()를 register
2. User part
- user function을 ppid.c 파일을 생성하여 구현
- user.h에 function 선언
- usys.pl에 새로운 매크로 추가
getppid() 함수를 구현하고자 기존에 이미 구현되어 있는 system call인 getpid()를 참고했다. getpid()는 현재 process의 id를 리턴하는 함수로, sysproc.c에 구현되어 있다. 정확히는 sys_getpid()가 있는데, getpid() 함수 없이 wrapper function이 그 역할까지 하는 것으로 보인다.
uint64
sys_getpid(void)
{
  return myproc()->pid;
}
위 함수를 이해하기 위해 다시 myproc() 함수를 찾아줬다. proc.c에 구현된 myproc() 함수는 현재 process의 상태가 담긴 proc structure를 리턴하는 함수이다.
struct proc*
myproc(void)
{
  push_off();
  struct cpu *c = mycpu();
  struct proc *p = c->proc;
  pop_off();
  return p;
}
그럼 다시 이 리턴받은 proc structure에서 pid가 아닌 ppid를 가져오기 위해서 proc structure의 구조를 찾아보았다. 여기서 주목해야 할 것은 parent이다. 우리가 얻고자 하는 것은 부모 process의 id이고 이를 위해서는 우선 부모 process를 찾아야 된다. 여기서 찾은 부모 프로세스에서 getpid가 해준 것과 똑같이 id를 가져와주면 될 것 같다.
struct proc {
  struct spinlock lock;

  // p->lock must be held when using these:
  enum procstate state;        // Process state
  void *chan;                  // If non-zero, sleeping on chan
  int killed;                  // If non-zero, have been killed
  int xstate;                  // Exit status to be returned to parent's wait
  int pid;                     // Process ID

  // wait_lock must be held when using this:
  struct proc *parent;         // Parent process

  // these are private to the process, so p->lock need not be held.
  uint64 kstack;               // Virtual address of kernel stack
  uint64 sz;                   // Size of process memory (bytes)
  pagetable_t pagetable;       // User page table
  struct trapframe *trapframe; // data page for trampoline.S
  struct context context;      // swtch() here to run process
  struct file *ofile[NOFILE];  // Open files
  struct inode *cwd;           // Current directory
  char name[16];               // Process name (debugging)
};
Implementation
1. function implementation
위에서 봤던 getpid() 함수 플로우에서 parent를 가져오는 부분만 추가하여 getppid()를 구현해 주었다. 이때, kernel/getppid.c 파일을 추가하여 아래 코드를 기입했다.
/** [new file] kernel/getppid.c **/
#include "types.h"
#include "riscv.h"
#include "defs.h"
#include "param.h"
#include "memlayout.h"
#include "spinlock.h"
#include "proc.h"

uint64 getppid(void) {
    return myproc()->parent->pid;
}
2. Makefile에 source file 추가
makefile에 만들고자 하는 getppid의 source file에 해당하는 kernel/getppid.o를 추가해준다. makefile 내에 K가 kernel로 정의되어 있으므로 이를 그대로 사용해서 directory를 표현해 주면 된다.
/** [add code] Makefile **/
OBJS = \
  $K/entry.o \

  /**
    생략
  **/

  $K/prac_syscall.o \
  $K/getppid.o  //추가된 코드
3. kernel/defs.h 파일에 getppid() 함수 선언
다른 c 파일들에서도 이 함수를 사용할 수 있도록 하기 위해서 defs.h 파일에도 getppid()를 선언해준다.
/** [add code] kernel/defs.h **/

/**
  생략
**/

// getppid.c
uint64 getppid(void);
4. wrapper function 구현
기존에 getppid()를 구현했던 kernel/getppid.c 파일로 다시 돌아가 wrapper function인 sys_getppid()를 구현해 준다. wrapper function을 구현해줘야 하는 이유는, user space에서는 우리가 만든 kernel 내부 함수인 getppid()에 접근할 수 없으므로, user space에서 접근 가능한 system call로 사용되기 위해서이다.
/** [add code] kernel/getppid.c **/
#include "types.h"
#include "riscv.h"
#include "defs.h"
#include "param.h"
#include "memlayout.h"
#include "spinlock.h"
#include "proc.h"

uint64 getppid(void) {
    return myproc()->parent->pid;
}

//추가된 부분
uint64 sys_getppid(void) {
    return getppid();
}
5. 새로운 system call인 getppid를 register
kernel/syscall.h에 getppid를 몇번째 system call로 사용할 건지 define 해주고, kernel/syscall.c에 이 system call에서 어떤 함수를 호출할 건지에 대한 코드를 추가해 주면 getppid를 register 할 수 있다.
/** [add code] kernel/syscall.h **/

/**
  생략
**/

#define SYS_myfunction	22
#define SYS_getppid 23
/** [add code] kernel/syscall.c **/
/**
생략
**/
extern uint64 sys_myfunction(void);
extern uint64 sys_getppid(void); //추가
static uint64 (*syscalls[])(void) = {
/**
생략
**/
[SYS_myfunction] sys_myfunction,
[SYS_getppid] sys_getppid, //추가
};
/**
생략
**/
6. user/user.h에 함수 선언
user/user.h에 새로 만든 getppid 함수를 선언해준다.
/** [add code] user/user.h **/

/**
  생략
**/

uint64 getppid(void);
7. user/usys.pl에 macro 추가
user/usys.pl에 getppid를 위한 macro를 추가하여 preprocess 방법을 define 한다.
/** [add code] user/usys.pl **/

/**
  생략
**/

entry("getppid");
8. user directory에 user function 구현
이제 user function을 구현해서 앞서 register 해둔 getppid를 사용한다. user/ppid.c 파일을 새로 만들어주고 아래처럼 user function을 구현한다.
/** [new file] user/ppid.c **/

#include "kernel/types.h"
#include "kernel/stat.h"
#include "user/user.h"

int main(int argc, char *argv[]) {
	int pid = getpid();
	int ppid = getppid();

	printf("My stuent ID is 2021037756\n");
	printf("My pid is %x\n", pid);
	printf("My ppid is %x\n", ppid);
	exit(0);
}
9. user function의 code 파일 Makefile에 추가
마지막으로 user function의 code file인 ppid.c를 Makefile에 추가해주면, ppid.c를 컴파일하여 실행할 수 있게 된다. 컴파일하는 부분은 이미 Makefile에 다 작성되어 있으므로, UPROGS 변수에 ppid를 추가해주기만 하면 된다.
UPROGS=\
    /**
      생략
    **/
    $U/_ppid\
Results
구현을 마쳐주고, make qemu 명령어로 xv6를 실행시켜준다. 그리고 ppid 명령어를 입력해 주면 아래와 같이 조건에 맞게 잘 실행되는 것을 볼 수 있다.

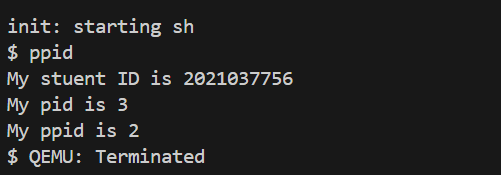
여기서 실행되는 플로우를 보면, 우선 user function에서 getppid() 함수를 호출한다. 그러면, kernel/syscall.h에서 몇 번째 system call인지를 찾아서 kernel/syscall.c로 간다. kernel/syscall.c에는 어떤 함수를 실행해야 하는지가 담겨있기 때문에, 해당 파일에 기재된 sys_getppid() 함수를 호출하게 된다. 그러면 return getppid() 코드가 동작하여, 부모 process의 id가 위 결과처럼 나오게 된다.
Troubleshooting
[문제1] getppid() 구현 후 실행하는데, 오류 발생

[해결 1] 추가로 필요한 header file을 include 해줌
- NCPU와 NOFILE 상수 undeclared 문제 해결을 위해 "param.h" 헤더파일 include
- lock 관련 오류 해결을 위해 "spinlock.h" 헤더파일 include
#include "types.h"
#include "riscv.h"
#include "defs.h"
#include "param.h"	//추가
#include "spinlock.h"	//추가
#include "proc.h"
[문제 2] user function을 실행하는데, 출력 시 type이 맞지 않는다는 오류 발생

[해결 2] 우선 int type을 가진 변수에 getpid()와 getppid() 함수의 리턴값을 assign 해준 뒤 변수를 출력
/** 기존 코드 **/
#include "kernel/types.h"
#include "kernel/stat.h"
#include "user/user.h"

int main(int argc, char *argv[]) {
	printf("My stuent ID is 2021037756\n");
	printf("My pid is %x\n", getpid());
	printf("My ppid is %x\n", getppid());
	exit(0);
}
/** 수정된 코드 **/
#include "kernel/types.h"
#include "kernel/stat.h"
#include "user/user.h"
int main(int argc, char *argv[]) {
int pid = getpid();
int ppid = getppid();
printf("My stuent ID is 2021037756\n");
printf("My pid is %x\n", pid);
printf("My ppid is %x\n", ppid);
exit(0);
}
[문제 3] user function 실행 시, ppid 값이 음수로 출력됨

[해결] implementation 시, 연습 파일을 무작정 따라 하다 보니 발생한 문제. 원래 목적에 맞게 getpid() 함수를 참고하여 리턴값을 수정해 줌
/** 기존 코드 **/
uint64 sys_getppid(void) {
    char str[100];
    if (argstr(0, str, 100) < 0)
        return -1;
    return getppid();
}
/** 수정된 코드 **/
uint64 sys_getppid(void) {
return getppid();
}
'학교 공부 > 운영체제' 카테고리의 다른 글
| [운영체제 실습] thread 이용해보기 (0) | 2025.04.12 |
|---|---|
| [운영체제 실습] Scheduling Practice (0) | 2025.04.04 |